Blog

The official photo blog of J. David Buerk Photography.

Kelly and Vince

Kelly and Vince tie the knot!  Friends and family flew from all over the country to join in on Kelly and Vince's wedding, and spend some time visiting Washington, DC. In addition to posting a sneak peek into Kelly and Vince's wedding, I am also happy to announce the launch of my new client area of the website; a place where clients and their friends and family can go to order prints and lots of other goodies... all from the convenience of your favorite web browser (or smartphone)!!!  Visit the client area, and look for Kelly and Vince, at www.jdbphoto.com/clients!

01

01

02

02

03

03

04

04

05

05

06

06

07

07

08

08

09

09

Lufthansa 747-8i at Dulles

Lufthansa recently became the first carrier to add Boeing's new 747-8i, the newest and largest variant of the legendary 747 jumbo jet, to their air fleet.  Washington Dulles International Airport and the Metropolitan Washington Airports Authority invited fifty lucky guests to welcome the historic, first commercial flight to the North American continent from a vantage point aside the runway.  Guests were thrilled to see airport operations from the closest safe threshold on the active runway. The entire set of photos can be seen on my Flickr, here.

01

01

02

02

03

03

04

04

05

05

06

06

07

07

08

08

Boeing 787 Dreamliner

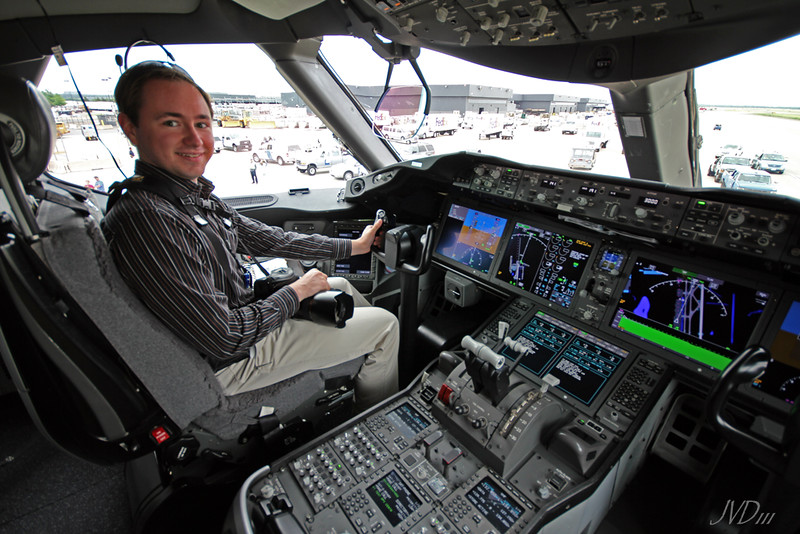
As Boeing's 787 Dreamliner makes its world debut tour, Washington Dulles International Airport was naturally one of its stops as the large airport serving the Washington, DC metropolitan area will naturally see quite a few of these brand new birds as they take to the skies.  In person, the 787 seems smaller than expected from pictures, however the interior is extremely roomy and comfortable.  It has that "new-plane-smell" and is oozing with technological goodies and creature comforts.  The new seagull-like wing design is most notable on this new aircraft, but can only be fully appreciated in person - it's quite magnificent! You can view the entire set of photos here on my Flickr.

01

01

02

02

03

03

And my awesome buddy James Dingell who joined me on the 787 took this great photo of me; check out all of his aviation and automotive photography on his Flickr, here!

J. David Buerk in the 787 Cockpit; Photo by James Dingell III

NASA SCA & Space Shuttles Discovery and Enterprise

Working at Washington Dulles International Airport and getting to know the people there for seven years has its benefits... especially when something big and historic flies in.  Not only was I lucky enough to be present for all of NASA's operations at Dulles involving Space Shuttles Discovery and Enterprise along with the 747 SCA (Shuttle Carrier Aircraft), but I was specifically chosen by airport management to be the official event photographer. Dulles held its first "Fifty for 50th" drawing, which brought 50 lucky civilians onto the threshold of the runway during the SCA and Discovery's flyovers and touchdown.  Some of the people pictured are these participants.

Furthermore, during my coverage of the events, my photography caught the eyes of NASA's SCA Pilots and Flight Engineers as well as some NASA Staff Photographers, all of whom have become fans of my work.  This resulted not only in continued correspondence and meeting in person with NASA crew-members (along with receiving some awesome, rare transport mission memorabilia), but also the invitation to visit NASA's operations in New York at John F. Kennedy International Airport, where I met with more of the SCA crew-members onboard the SCA itself, and was invited to also stay for Enterprise's demating.  Due to other photography obligations the next day in Washington, DC, I unfortunately couldn't stay in New York to see the demating, which they were preparing for during my visit.

All of this took place in a whirlwind of a month's time, and here, finally, is a sampler of the resulting photos.

The entire set of photography of my NASA coverage (485 photos), from start to finish, can be seen on my Flickr by clicking here.

Some images are available for print purchase on my website here.

01
02
03
04
05
06
07
08
09
10
11
12
13

UPDATE (January, 2013):

SCA_Frame

This is one of my autographed prints of NASA's Shuttle Carrier Aircraft departing Dulles for JFK with Space Shuttle Enterprise. I shot this photograph on April 27th, 2012. The Space Shuttle Ground Crew signed 9 prints (17x22) of my photograph aboard the SCA at JFK in New York on May 12th, 2012.

Upon returning to Washington, I gave away several copies to some close friends, and individuals who helped make my involvement with the Space Shuttle transport possible. I'll be grateful my entire life for being able to partake in this historical event.

This is my framed copy; I gave my Dad an identical one this past Christmas. During the events, I met most of the crewmembers - they were nice enough to also give me an areal photo of the SCA with Space Shuttle Discovery flying above the Washington Monument, signed by the Discovery transport Flight Crew, as well as a Mission Patch that flew on that mission - I have not had these framed yet.

My print seen here is a 17x22, in a 30x24 frame. It reads:

Shuttle Carrier Aircraft
with
Space Shuttle Enterprise

SCA Ground Crew
LeRoy Marsh     Eugene Smith     David Lanmon

Arvid Knutson     Robert Hackaday     Rick Brewer

Canon EOS Elan 7 / 7E: Replacing A Broken Film Door Latch

Plastic is a wonderful invention with many benefits including lower weight and production costs, but often there is also a tradeoff in durability.  The Canon EOS Elan 7 / 7e was one of Canon's last 35mm film cameras, and is also regarded as on of the best due to its simplicity married to modern EOS technologies.

MG_8770-2.jpg

The Canon EOS Elan 7 is constructed of a mix of metal and plastic, but one of the most important parts of this otherwise magnificent film camera features a design flaw, making it easily broken:  The film door latch is constructed of cheap plastic which will snap off if slamming the film door shut too violently, causing the door to not be able to lock.

Today you'll learn how to easily replace the door latch for under $20, in less than 15 minutes.  This is much cheaper and easier than an out-of-warranty Canon repair.  This is the 2nd time I broke this part; the first time, Canon had my camera for 14 days and charged $120 for replacing this part.  This isn't the only guide out there, but I thought the pictures in others were hard to distinguish.

Supplies:  Replacement Door Latch (found online below), small jewelers philips head screwdriver, and a bit of time.

MG_8726.jpg

1) First, you need to get the replacement part.  Make sure this is the part that is broken - you should be able to see the sheared plastic inside the door latch on the camera body (NOT on the film door itself).  If you're unsure, you can still proceed with this guide and very easily check the latch mechanism.

Here are several vendors I found selling the part.  I got mine off of eBay, and ordered 2 in case I break it again.

Here you see the broken part along with the replacement part:

MG_8740.jpg

2) Like any electronics project, start by removing the batteries.  We need to remove 7 screws from the camera and strip off some of the body to access the part.  Order doesn't really matter for this, but let's start with the two screws on the side to remove the latch assembly cover panel, and 1 for the body.  Below, you'll see that I've already removed the broken latch.

MG_8727.jpg
MG_8730.jpg

3) Next get the two screws on the bottom of the camera body.

MG_8728.jpg

4) Finally, remove the 2 screws from the front of the camera body, and keep these separate: they are slightly longer than the other screws.

MG_8729.jpg

5) The front face should easily come off.  Remove the face, and then detatch the broken latch being careful not to ruin the spring's shape.

MG_8731.jpg

6) Install the new latch by hooking the spring first, then placing the latch back on the sliding track.  It should "snap" into place, but will only be held in by friction and the spring holding it in place.  The triangle arrow on the latch should point down, and the metal fingers should be in contact with a small electrical plate on the circuit board; this tells the camera if which position the latch is in, and likewise if the film door is locked or not.

MG_8742.jpg
MG_8743.jpg
MG_8747.jpg

7) Now, replace the latch cover panel and the two screws holding it in position to ensure the new latch doesn't fall out.  Note the panel has a notch at the top that matches a notch in the camera body.

MG_8749.jpg
MG_8755.jpg

8 ) Reinstall the faceplate, and tighten the two long screws on the front, two screws on the bottom, and one screw on the side.  You should now have a fully operational film door - now get out there and shoot!

MG_8757.jpg

2020 Update

Hello all, just dropping in to provide some updates to this article, as it has been one of the most popular pages on my website since I first published this guide in 2012.

I routinely receive messages from fellow EOS film camera owners either thanking me for this guide, or searching for the OEM replacement parts, which were still available when I wrote this, but have long dried up in availability.

Sometimes 3rd party replacement parts pop up on sites like eBay, but these listing frequently disapear or sell out, making the parts hard to come by. Here is a listing for a 3rd party repair kit currently available as of this writing (I have no experience with this 3rd party part, kit, or seller, so cannot comment on its quality) - note it does not have the metal contact “fingers” which would need to be transplanted to restore proper full function:

2x Hook Back Lock Door Inside Buckle+Tools for Canon EOS 30 33 ELAN 7 7E ZVMB101 sold by ewwt-cnd

Several years ago I suggested that the part could easily be fabricated and built stronger with the rise of 3D printing, and simply transplant the metal contact “fingers” from the broken OEM part to a replacement. That’s exactly what several people have since done; CAD models of the part are now available for download from several sources (I’m linking two that were posted to my site’s comment section here - if there are others, please feel free to comment them below). This is not my work, nor do I have experience with these parts, but the comments with others’ experiences seem very good:

CANON Eos 50e Door Latch by iscand

Canon EOS 30 / 50 / Elan II / Elan 7 film door latch by OndrejP_SK

CANON Eos Elan II, Elan IIe Door Latch by bitterbot

This is great if you have access to a 3D printer, but what if you don’t? In the old days you could just tape your film door shut and be done with it. With the ELAN, you still can, however depending on how / which part of your latch broke, this may require extra steps.

I’ve now created a video that demonstrates correct function of a fully-operational (non-broken) ELAN 7 latch, but also shown how film may be loaded if the latch mechanism isn’t allowing the camera to recognize that the door is closed - this case scenario applies to some, but not all door latch failures. You can then simply tape the door shut and continue using your camera - it’s imperfect, but it’s better than nothing if you’re in a pinch.

This video demonstrates the function of a fully-functioning film door on an ELAN 7, and shows a method to continue using your camera if the camera is otherwise unable to slide the film door latch and advance film or hold the door in place on its own, now that OEM parts are no longer available, and not everyone has access to 3D printed parts that have been developed by owners. Some steps may or may not be needed depending on the damage to your latch; this video is for demonstration and example purposes, and will not apply to all cases. Some people's cameras will still slide the film latch and advance film upon closing the film door, without need for manually sliding the latch as seen in this video - use what tips and ideas apply to your own case. For more about the Lubitel 2 medium format lens that makes a cameo in this video, read my article about my retrofit project that was featured in Fstoppers and PetaPixel.

I do still monitor the comments on this page, and am happy to have helped so many of you around the World. I hope this video provides you with a bit more help in diagnosing problems and presenting ideas for solutions when other options have failed.

Happy shooting and great exposures to all of you!