
I'm certainly not the first one to do it. Nor am I using the oldest lens on a digital. In fact, it's been done before many times with large format lenses. But it's still a fun way to upcycle an old, unused or broken camera into a cool project and unique tool in your arsenal of camera gear. What I did is way easier than converting your SLR body's lens mount too!

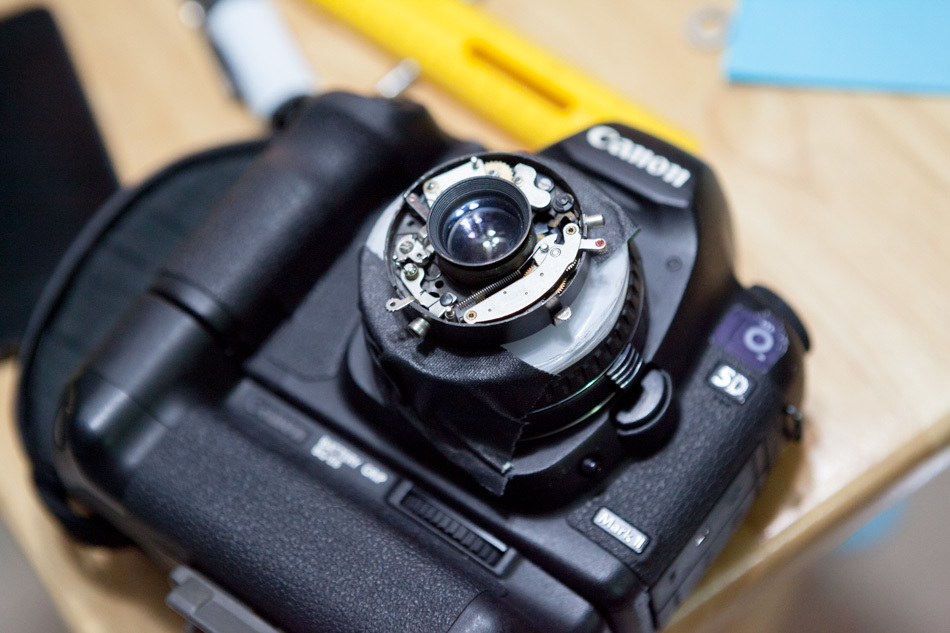
An updated photo for the renewed interest in this project of mine:

Last year I bought several vintage cameras while antiquing on vacation in Florida. The real prize was a completely unused, mint condition Polaroid 800 Land Camera Kit for $30 (a STEAL on a vintage kit worth over $100 - I have NO intention of destructively modifying this awesome camera that you can't really even get film for anymore - relax). I also picked up a Lubitel 2 TLR for $15 in fair condition; I'd wanted a TLR for years. The Lubitel had a sticky shutter (which apparently is one of it's most common issues) and I intended to fix it, and if that proved impossible, it will look nice on a shelf.

Fast forward a year later, and I'm finally getting around to toying with the Lubitel. I had previously found a great walkthrough of how to clean and calibrate the Lubitel, and knew I'd be needing it. I also began with the intention of writing my own tutorial on how to disassemble and service a Lubitel with more pictures than that walkthrough. It became evident very early that I would be writing a DIFFERENT tutorial.

I began by gathering all the tools I'd need to dismantle the Lubitel and make a mimosa... I mean, it was late Saturday morning, and I like mimosas; what better way to relax with some camera gear? (I'd already had my coffee :-) )

The first step is to remove the focusing lens assembly by loosening the tiny set screws around the rangefinding ring and unscrewing. Then remove the focusing gear ring on the taking lens the same way by loosening its set screws.

You will now need to remove the entire shutter / aperture / timer mechanical assembly from the Lubitel's body. I suggest removing the film door completely just for ease. Looking inside the camera you will see a retaining ring around the rear lens element. You will need to keep this stationary and rotate the mechanical assembly to loosen. Carefully use a wide set of needle-nose pliers to keep the ring in place, and twist the assembly. Once loose, you can then safely use your fingers to unscrew and remove the entire assembly.

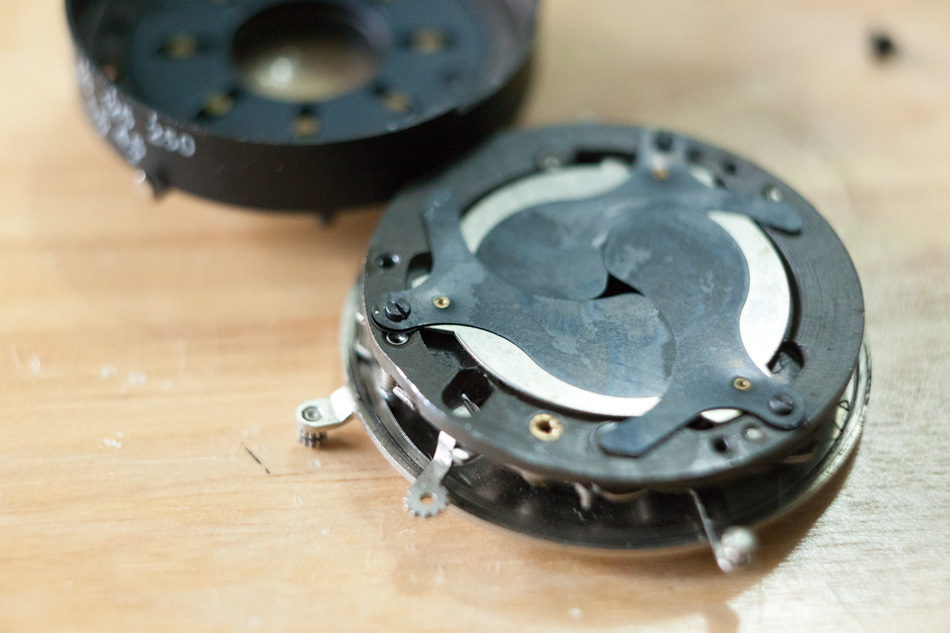
Now you should have the Lubitel's entire mechanical assembly removed from the body. Don't lose that retaining ring; we're going to need it for the retrofit mount!

Removing a few screws on the back of the assembly will release the back and expose the shutter and aperture blades. My Lubitel seemed to be having mechanical shutter problems rather than the blades just needing a cleaning, so I continued to dismantle the shutter assembly.
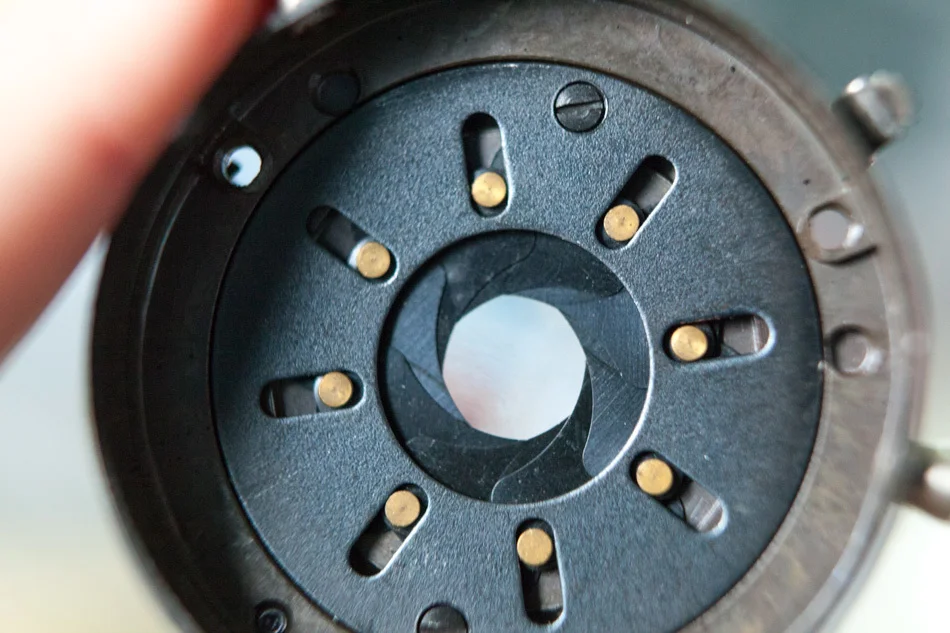
Underneath the shutter blades is a cocked position ring that fires the shutter.
Continuing on, to determine the shutter's problem, I removed the front cover by unlocking the set pin and rotating the cover until it clicked loose. And it was at this point that the Lubitel's problem became clear; a broken spring fell out, along with a cocking mechanism from the shutter. It was unclear where the spring belonged, but the cocking mechanism clearly had a failed rivet. I tried, but there was no way to keep the loose part in position with the failed rivet.

So... Plan B!!! Let's try and retrofit this to work on my modern SLRs!
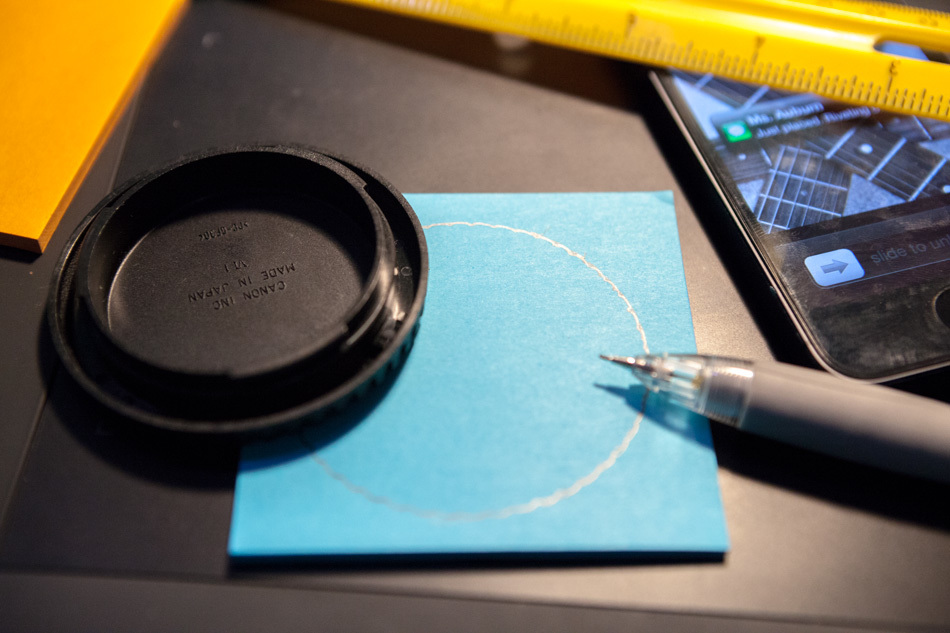
I remembered the PetaPixel post about the broken Zeiss Ikon lens retrofit to work on a 5D Mark II; I'd been wanting to try that ever since I saw it two years ago. I grabbed the nearest EF Body Cap and knew exactly what I was going to do. First I traced the outside of the body cap onto a Post-It note, then I measured the diameter of the Lubitel's retaining ring.
Here comes the geometry... Yup! All those years of struggling to pass high school math came back to me. All I could think of was Mr. Munson and Revolution Number 9, Sharing Club meetings and a few detentions served washing down my geometry teacher's chalkboard (I never did the "lick" option, nor the "dot" - Mr. Munson gave everyone three options: A - Clean his chalkboard with soapy water. B - Stare at a dot on his board for 1 hour in silence. C - Lick from one end of the board to the other, in one non-stop motion, before the dust has been washed away, and be released immediately. I remember one instance where I had to wait for 3 other guys to complete their licks before I was allowed to wash the board. Munson really knew how to screw with students; as one was licking, he crossed tongue-trails with one of the others and Mr. Munson immediately exclaims, "EWWWWW you crossed paths; it's like you guys kissed!!!" With that, the guy lost composure and lifted up in disgust... making him have to restart his lick from the beginning LOL. Oh, high school. I don't miss you, but God the memories I have from you lol.)
Anyway, going back to being a photography blog... Geometry, and why my favorite math teacher's class actually DOES matter after all these years... Thank you for everything Mr. Munson!!! I don't remember most of everything you ever taught me, but I will ALWAYS remember you and your class!
We need to find the center of a circle. I broke out my compass and protractor, the same ones I used throughout high school, and made my marks.


I cut out the Post-It note and placed the circle onto my body cap. Using the center spot I just found, I firmly pressed a dimple through the Post-It into the plastic of my body cap, marking the center on the cap.

Next, I took the radius of the retaining ring, and marked the area to cut on the body cap.

I knew from playing with the assembly that I'd be mounting my new lens, once assembled, onto an extension tube. I just wasn't sure what the exact spacing was going to be quite yet. I cut out the body cap using a Dremel and screwed the reassembled aperture and lens assembly onto the body cap; my newly created EF lens mount.

I quickly found that the 12mm Extension Tube was too little, and the 25mm Extension Tube held my lens too far from the camera's focal plane (unless I wanted macro only, of course). It wasn't quite usable yet, but it sure does look cool so far, even if everything so far was preliminary.

Just using this setup (the lens now mounted) I then began playing with the effects this lens is going to offer me. In case you're curious, this is what it looks like to shoot through heavy mold.


After cleaning, I played with the freelensing possibilities.


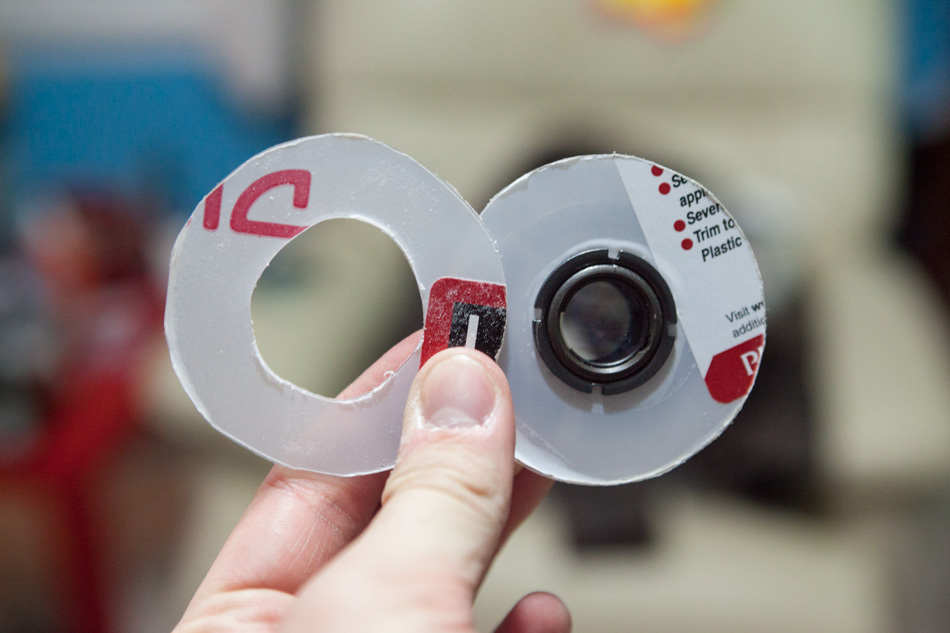
This was cool and all, but for a mountable lens, there are a few problems I needed to sort out. 12mm is too short, 25mm is too long; it needs to be placed somewhere in between so that focus at infinity was possible. Shortening a 25mm extension tube isn't feasable, so I knew I'd be expanding off my 12mm tube. Just by playing with it freelensed, I approximated the distance I needed to mount the lens for it to be usable.

There is just one issue with this: the Lubitel's retaining ring isn't anywhere near long enough to make up this distance, as seen above. In thinking on it a little bit, I decided the best solution was to mount the Lubitel lens to a sheet of plexiglass and use more plexi as the spacer I need, while keeping those light leaks out (as fun as I think they are).
I bought a sheet of Lexan and cut out two rough circles matching the diameter of my Canon Body Cap. I don't have the proper tools to make a really pretty, perfect circle like others have - I'll smooth it out later the hard way. Besides; it's an imperfect lens - having an imperfect mount kinda just adds to the fun!

I followed the same steps Mr. Munson so well taught me to find the center of my rough circles. I only needed to roughly find the center anyway, because I knew I'd be smoothing the edge down anyway to make it more evenly round.


Now I have a good start on my spacers. I've marked the cut I'll need to bore out to mount the Lubitel lens, but first I'll need to round the edges - and I'll have to round both spacers at the same time to ensure they match.

Next I drill a hole in the center of both spacer discs and mount them on a bolt with a locking nut to keep everything steady; we're about to turn up the RPMs.

Mounting this onto a drill, I fire up the grinding wheel.

Gradually building up to high speed, the counterrotating discs and grinding wheel shaved the edges off the discs to even them up while keeping the hole centered. Yes, a bore the size of the Canon Body Cap would have been a MUCH better route to take, but I'm not about to spend $45 on that bit for 1 cut, and I don't have any other tools to do the job. It doesn't have to look pretty to work nicely :-)

Now that those are even, I can bore out the center to mount the Lubitel. This bit is 1/16h" too small, so a tiny bit of Dremel work was needed to expand the edges of this cut.


Next I mounted the Lubitel lens to one of the spacer discs. The other spacer's inner bore was widened with the Dremel to allow access to the retaining ring and keep the discs flush. This cut is very rough, but doesn't need to be perfect since it will not be seen.

Now it's time to test out the spacing; I had approximated the need for just two discs of plexi. Using some gaff tape, I securely hold my contraption together with tape on the extension tube, and mount it on the camera.
I estimated perfectly! Just like any other lens, focus ends just past infinity and traverses closer to headshot distance, which is great since this is a 75mm f/4.5 lens, shooting just slightly wider than my "moneymaker lens," my prized EF 85mm f/1.2L II USM. At f/4.5, it isn't the fastest lens in the world, but it is fairly sharp, and it certainly seems to have some character, probably helped quite a bit by the omission of modern anti-glare and diffraction coatings. These are handheld shots, just taped together:


It was late and Jake and I were hungry after a bit of stargazing through the telescope for the Northern Lights (which never showed), so we went to Steak N Shake and killed off my gift card from Christmas. It was past 3, so this isn't meant to be an amazing shot of Jake - we were both exhausted and just waiting for our shakes.


The next morning I dissected another circle and found four spots on my body cap to safely drill screw holes. I chose to screw all my pieces together rather than superglue them because I preferred to have a construction that I can fully disassemble and service should I need to; superglue would mean I'd maybe have to fabricate more parts than necessary if anything needs work later.

I carefully marked my points to drill on the body cap's interior, also ensuring that the screws would be placed in an X pattern, rather than willy-nilly around the cap's axis. These drill points were mirrored on my plexiglass spacers. Once I had all my holes drilled, I used some sheet metal screws to slowly thread the holes and hold everything together.

Marking the spacers to ensure the threading remained the same after painting, I then disassembled everything. Using some matte black spray paint, I gave both discs an even coating so they could dry throughout the day. Make sure to strip the protective plastic layer off the Lexan and ensure there is no residual dust from your cuts before you begin to paint.


While the paint was drying I took care of an issue that had concerned me during my test mountings; the Lubitel assembly has a metal post on the back which may cause the lens to be mounted lopsided. I noticed that this post was exactly the same height as my Lexan's thickness, so i cut out two small squares of plexi and superglued them to the back of the Lubitel to ensure the lens could only be mounted flush and evenly, paying careful attention to not block the movement of the aperture selection ring. Grinding this post off likely would have caused the aperture ring to have bound against my plexiglass camera mount.

Now we're just waiting for paint to dry. I took care of one final detail - the screws I had were the shortest I could buy, but they were still too long. I took each to the grinding wheel to shorten them. They needed to be long enough to bite through 2 layers of Lexan and into the body cap, but they cannot extend through, otherwise the body cap will not be capable of mounting on an EOS body mount.

Finally the paint is dry and, after a final cleaning and dusting, I snugly mount the Lubitel onto its outer Lexan disc, ensuring the aperture scale is visible from the top of the lens when mounted. Next I stack the discs and body cap together and assemble with my four screws.


You can see that the lens is sturdily constructed, and may be serviced simply by disassembly. The retaining ring is not accessible without disassembling the 2 discs and body cap. Mounting my new lens, I ensure everything is working properly. It works great! I'm a bit torn; the focus gear makes focusing easier, but leaving it off looks so much cooler - Steampunk is back in style, baby! I love it!

I replaced the focus ring just to make operation easier. I can always take it off again if the mood strikes me :-D

The updated photo again:

Not only is the aperture fully functional, but the timer also still operates. It doesn't fire anything since the shutter is inoperable (and not even installed in my lens actually), but it's fun to pull the lever and hear the buzzing countdown.
This lens is f/4.5, but it certainly has some interesting personality.

And just set the focus to infinity, pull off the lens (leaving the extension tube on the camera body) and it makes a great freelensing toy.

I'm still playing with the lens and running it through its paces. It will prove to be an interesting addition to my lens arsenal; I can't wait to use it on a sunny engagement shoot for some light-leak, tilt-shift fun!
This is a real light leak; I wasn't using the plastic bag trick!


About David:
J. David Buerk is a freelance photographer based in the Washington, DC Metro area. He shoots extensively for Dulles International Airport, in addition to portraiture, weddings, and other events. His work has been used by news agencies including USA Today and Fox News, and he is available for travel across the US and overseas.